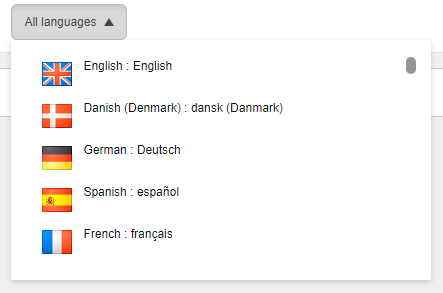
This blog post is an extension of an earlier post I wrote on how to sort the languages in Sitecore 9 Forms Builder. You can read it here https://blog.fyhn.io/post/2019/02/24/sort-languages-in-sitecore-9-forms-builder-language-dropdown. To make it even easier to locate a specific language, this post focuses on displaying the flag icon for each language in the dropdown. The below image is the result we are going to achieve.
We are going to extend the forms.getLanguages pipeline (located in App_Config\Sitecore\ExperienceForms\Sitecore.ExperienceForms.Pipelines.Client.config) with a processor responsible for resolving the path to the language icon for each language and adding it to the data model.
1. Extend the data model
First, we have to extend the LanguageListItem class with a property containing the path to the icon. Create an ExtendedLanguageListItem class that inherits LanguageListItem and add the icon path property.
public class ExtendedLanguageListItem : LanguageListItem
{
    public string IconPath { get; }

    public ExtendedLanguageListItem(LanguageListItem languageListItem, string iconPath)
    {
        Name = languageListItem.Name;
        DisplayName = languageListItem.DisplayName;
        Text = languageListItem.Text;
        Description = languageListItem.Description;
        HasVersions = languageListItem.HasVersions;
        IconPath = iconPath;
    }
}
2. Create a pipeline processor responsible for resolving the icon path for each language
The processor iterates the languages and uses the GetIconPath method to resolve the path. Next, it replaces the LanguageListItem objects in the pipeline arguments with our ExtendedLanguageListItem containing the path.
public class GetLanguageIconsProcessor : MvcPipelineProcessor<GetLanguagesEventArgs>
{
    public override void Process(GetLanguagesEventArgs args)
    {
        var iconPaths = new Dictionary<string, string>();
        foreach (var itemLanguage in args.ItemLanguages)
            iconPaths.Add(itemLanguage.Name, $"/-/icon/{GetIconPath(itemLanguage, args.FormBuilderContext.Database)}");

        args.Languages = args.Languages.Select(lang => new ExtendedLanguageListItem(lang, iconPaths[lang.Name]));
    }

    private string GetIconPath(Language language, Database database)
    {
        string iconPath = language.GetIcon(database);

        if (string.IsNullOrEmpty(iconPath))
        {
            LanguageDefinition languageDefinition = LanguageDefinitions.GetLanguageDefinition(language);
            if (languageDefinition != null)
                iconPath = languageDefinition.Icon;
        }

        if (string.IsNullOrEmpty(iconPath))
            iconPath = "Office/32x32/flag_generic.png";

        return iconPath;
    }
}
3. Add img tag to the .cshtml file containing the markup
Finally, we have to add a img tag in the markup file in order to display the icon. The file is called FormsListControl.cshtml and located in the sitecore\shell\client\Applications\FormsBuilder\Layouts\Renderings\FormsListControl folder. Navigate to line 194 and add the img tag as shown below.
...
<div class="sc-listcontrol-tile-content">
    <!-- Add the below line -->
    <img style="margin-right:10px;float:left" src="{{ iconPath }}" border="0" alt="" width="32px" height="32px">
    {{{ListControl:GetTileTemplate @("@root.Settings.Id") this}}}
</div>
...
Done! Don't forget to add your pipeline processor to the config file.
If you want to add the language icons in the content editor, use this post: https://xtremdev.com/2017/10/20/sort-language-list-and-show-language-flags/
And for the experience editor, use this post: http://www.xcentium.com/blog/2016/08/05/language-flags-not-displayed